
🔥🔥🔥:稳定好用的机场/梯子 TAG 全球250+节点、99+流媒体解锁,更多参考机场推荐
前言
当前 V2Ray 应该算是比较好用的翻墙软件,和 ss、ssr 相比还是很稳定的,不容易被检测,尤其是加上 Nginx 和 TLS,再做个简单的网站顶在前面,完全伪造成了一个正常的网页访问行为,非常安全可靠,并且具有很强的抗检测能力。
- 必须会简单使用 Linux 命令行,即 Shell
- 以下示例中的域名均为
www.example.cc,域名、UUID 以及 MTProto 的密钥请记得替换成自己的 - 有耐心、喜欢折腾或者想自己学点东西的就往下看
- 没耐心的可以去用机场或者一键脚本
- 这是针对学生和工薪阶层且有科学上网需求的同志,土豪请直接用机场去吧(比如外号 richCloud 的 rixCloud)
参考文档
V2Ray 官方文档 V2Ray 白话文教程 MTProxy 官方文档
涉及的内容
graph LR
  subgraph V2Ray
    v2rayws[V2Ray WebSocket]
    v2raytg[V2Ray MTProto]
  end
  free((WAN))
  rep(外部请求) --> in[Nginx]
  in -- / --> web[腾讯公益404]
  in -- /wss --> v2rayws
  v2rayws --> free
  tgc(Telegram Client) --> v2raytg
v2raytg --> free- 域名申请;
- Let’s Encrypt 申请 SSL 证书;
- Nginx 作为前置服务配置 web 主页;
- 通过配置 Nginx 反向代理访问后面的 v2ray 服务;
- v2ray 同时提供 mtproto 服务;
- 使用腾讯公益 404 作为 web 主页;
大致的步骤
- 准备服务器;
- 申请域名;
- 创建网站根目录;
- 安装 Nginx;
- 获得 SSL 证书;
- 修改 Nginx 配置支持 Https;
- 安装启动 V2Ray;
安装部署
端口规划
| Port | Listen IP | Use |
|---|---|---|
| 80 | 0.0.0.0 | Nginx Http |
| 443 | 0.0.0.0 | Nginx Https |
| 10443 | 127.0.0.1 | V2Ray WebSocket |
| 8080 | 0.0.0.0 | V2Ray MTProto |
服务器准备
拿来翻墙用的服务器,肯定是本着便宜好用性价比高的原则来选择。搬瓦工毕竟有 cn2 和 cn2 gia 线路,价格也算是最便宜的,重点可以支付宝支付,还是选择搬瓦工吧。
逢年过节,搬瓦工都会推出特别款优惠主机,比如双十一、黑五,性价比极高!可以关注下。
BandwagonHost 套餐选择
搬瓦工套餐很多,相同配置不同价格排序如下:
普通线路 < CN2线路 < CN2 GIA线路
一般情况下个人使用或者家用的话,最便宜的套餐足以,不常看视频,一个月流量在 100-200GB。
注册购买什么的就不赘述了,现在上过学都看得懂英文。
根据自己的需求选择相应的配置即可,避免浪费。
- 访问谷歌,简单的网页访问需求
| |
19.99 美刀一年,只能年付。 OpenVZ 架构,唯一的优势就是便宜。高峰期对主机性能和网络都有影响。
- 偶尔看看视频,比如油管
| |
29.99 美刀一年,只能年付。一般人建议买这个。
KVM 架构,延迟勉强,170ms左右,油管 4K 撑得住。高峰期对网络有一定影响。
- 强烈视频需求,打游戏,需要低延迟网络
| |
39.99 美刀一年,只能年付。此套餐经常缺货,想买的需要关注,有钱可以买上一级套餐(可季付、半年付、年付)。
同样 KVM 架构,延迟比 cn2 略低,油管 4K 撑得住。高峰期对网络影响较小。
准备软件
1、 MobaXterm: SSH 客户端工具,集成了 SFTP,安装免费版即可 2、 Visual Studio Code: 编辑器,主要拿来编辑 Nginx 的配置文件和 V2ray 的配置文件,支持 JSON 代码高亮,避免配置文件编写错误
配置服务器
这里以搬瓦工为例。
更换操作系统
建议选择 CentOS7 吧,方便好用。如果是 KVM 架构的机器,还能选择支持 bbr 的操作 CentOS。这里以 CN2 GIA 的服务器为例。
以下命令均以 CentOS7 下的命令为例
- 登录搬瓦工
Client Area,点Services -> My Services查看自己的所有服务 - 点击对应
Product/Service后面的KiwiVM Control Panel按钮进入控制台
- 首先将虚拟机关机,关机后才能重装系统
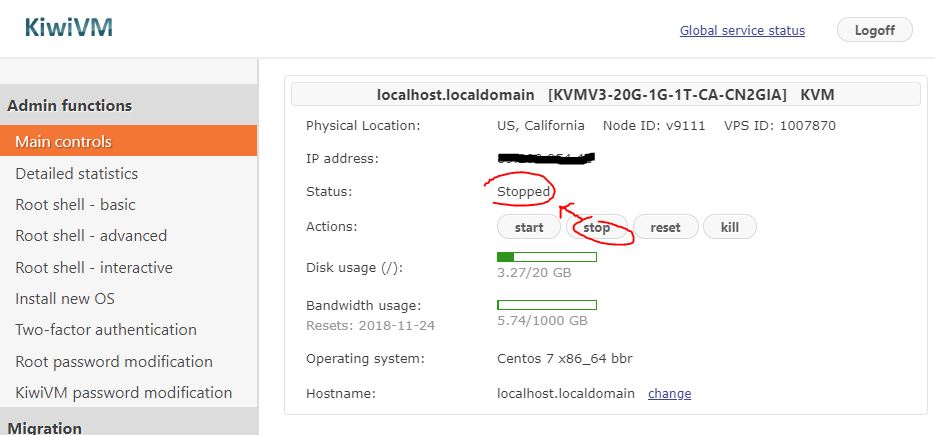
- 选择
Install new OS,然后选择"centos-7-x86_64-bbr",勾选"I agree ...",点Reload重新安装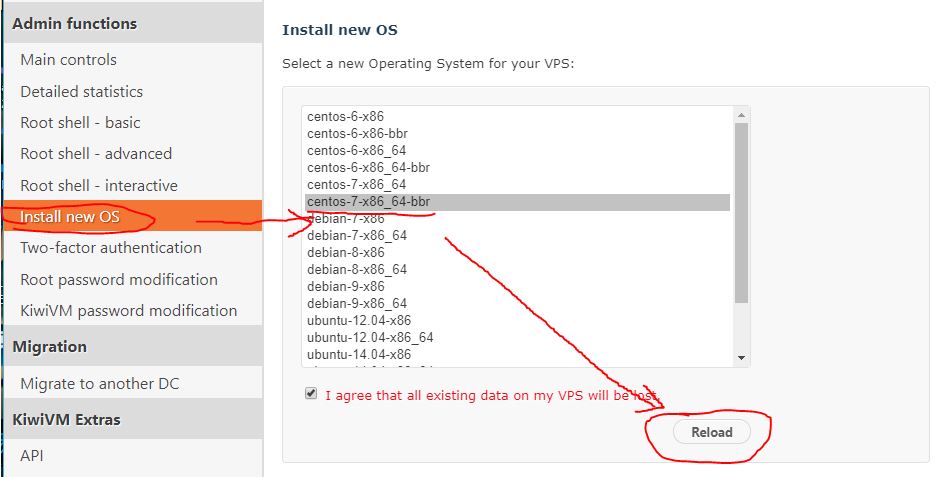
- 记下 root 密码和端口号备用
更改服务器密码
使用 MobaXterm(或者其他 SSH 工具),使用刚刚的密码和端口号登录服务器,注意下端口号,搬瓦工的 SSH 不是默认 22 端口。
登录后执行passwd,然后输入两遍新密码即可
| |
更新系统
搬瓦工自带的 epel 总觉得缺包,所以卸载重新安装下。 同时需要安装下 vim、git、zip 和 unzip。
| |
申请域名
由于要使用 TLS,所以需要一个域名。建议注册.cc结尾的域名,便宜并且不需要实名认证。
传送门:https://wanwang.aliyun.com/
假设我们申请的域名的是:example.cc,编写配置文件时记得替换成自己的。
配置域名解析
域名解析这里配置两条,把example.cc和www.example.cc都指向服务器的地址。

配置好之后,可以在本地 ping 一下,看看通没通。
| |
准备 web 根目录
新建目录
1mkdir -p /www/root增加
index.html1vim /www/root/index.html按下
i键到插入模式后,将以下所有内容贴进去。1 2 3 4 5 6 7 8 9 10 11 12 13 14<!DOCTYPE html> <html> <head> <title>404</title> <meta http-equiv="Content-Type" content="text/html" charset="UTF-8" /> <script type="text/javascript" src="//qzonestyle.gtimg.cn/qzone/hybrid/app/404/search_children.js" charset="utf-8" homePageUrl="https://www.example.cc/" homePageName="回到我的主页" ></script> </head> </html>
安装配置 Nginx
Nginx 安装后,会用到两份配置:
- 第一份是给第一次申请 Let’s Encrypt 的 SSL 证书用的(由于此时还没有证书,配置成 Https)
- 第二份是增加了 V2Ray 反代和 Http 重定向 Https 的配置,这个就是一直要用的配置
安装 Nginx
很简单,一行命令搞定。
| |
编辑nginx.conf
文件/etc/nginx/nginx.conf。
害怕出错的或者新手请将文件 SFTP 下载到本地,使用 VSCode 修改后再 SFTP 传回服务器。
熟悉 vim 的就直接在命令行修改吧。
配置文件如下:
| |
启动 Nginx 服务
| |
然后查看下运行状态是否已经正常启动,看到running即是正常。
| |
然后打开浏览器访问 <www.example.cc> 和 <example.cc>看是否能打开腾讯公益 404 页面。能打开说明 Nginx 已经正确配置,然后就可以开始申请 SSL 证书了。
安装 V2Ray
具体参考V2Ray 官方文档:
| |
安装完成后自动启动,这里先把它给停了
| |
申请 Let’s Encrypt 的 SSL 证书
Let’s Encrypt 有很多 ACME 客户端的实现。这里选用acme.sh。
安装 acme.sh
安装很简单,一个命令:
| |
安装完成后执行下
| |
申请证书
很简单,一也是命令:
| |
使用 ec-256 证书,让通信更安全吧。
将证书安装到目录
这里将证书放到/etx/v2ray目录下。
| |
这行命令除了将证书放到指定目录下外,还会自动创建 crontab 定时任务,后面引号里的命令是定时任务更新证书后执行的命令。
配置 Nginx 支持 Https 访问
不废话了,直接修改/etc/nginx/nginx.conf,完整配置文件如下:
| |
配置完之后重新启动 Nginx
| |
访问 <www.example.cc> 和 <example.cc>,如果自动跳转https://www.example.cc并且正确显示公益 404 则已经配置正确。
配置 V2Ray 并启动
前置的所有服务都已经配置完毕,只差最后的 V2Ray 了。
为 V2Ray 生成一个 UUID
使用 V2Ray 自带的v2ctl工具生成一个新的 uuid。
| |
记录下此 uuid
为 mtproto 生成一个密钥
使用 linux 系统创建伪随机数作为密钥。
| |
记录下此随机数
修改/etc/v2ray/config.json
同样的,没把握用 vim 修改的,就拷贝下来在 VSCode 里修改,改完再传回服务器。
将刚生成的 uuid 和随机数填入对应的位置。
完整配置文件如下:
| |
启动 V2Ray
开启开机启动并启动。
| |
启动之后查看下运行状态,看是否正常运行
| |
客户端配置
客户端配置不尽相同,对应客户端详细配置可以自己百度。
这里用文字描述下大致的配置步骤:
- 协议类型选择
Vmess,需要和服务端一致 - 地址填
www.example.cc,需要和服务端一致 - 端口填
443,需要和服务端一致 - UUID 填
27e0efcc-8e13-fef1-9e82-febebc469b2b,需要和服务端一致 - 传输协议选择
ws,路径填写/wss,需要和服务端一致 - 开启 TLS
- AlterId 填写
64,需要和服务端一致
iOS 客户端
iOS 下的 VPN 类客户端在国区基本下架下完了,V2Ray 推荐使用 Kitsunebi 的 TestFlight 版本。
- 在手机上安装 TestFlight App:https://itunes.apple.com/us/app/testflight/id899247664?mt=8
- 在手机上打开这个链接自动加入 TestFlight:https://testflight.apple.com/join/2w6EF67u
–>原文地址
其它
其它客户端请参考: Windows Android Mac OS X
最后提供两份客户端配置文件
无需求的以下就可以不看了。
PC 用的支持国内外分流
| |
路由器用的,透明代理
| |